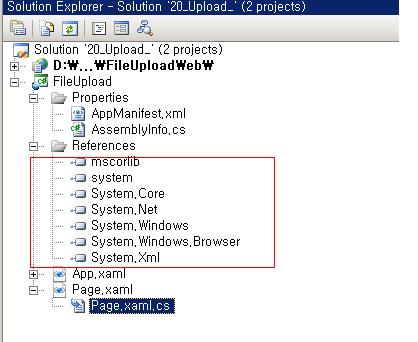
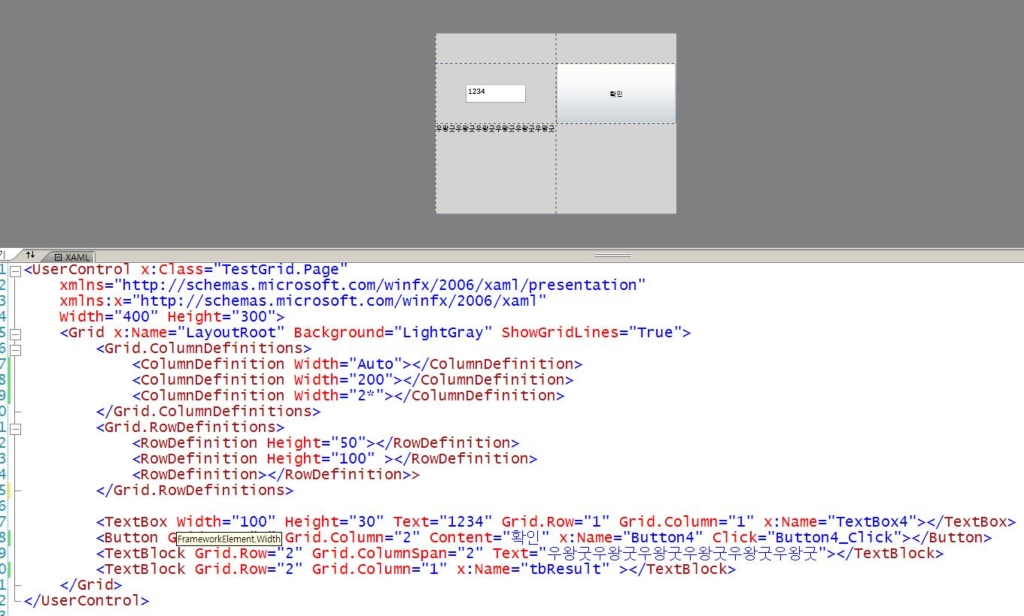
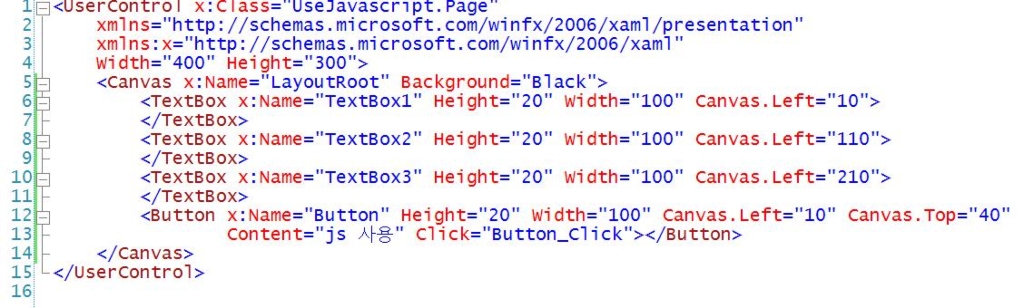
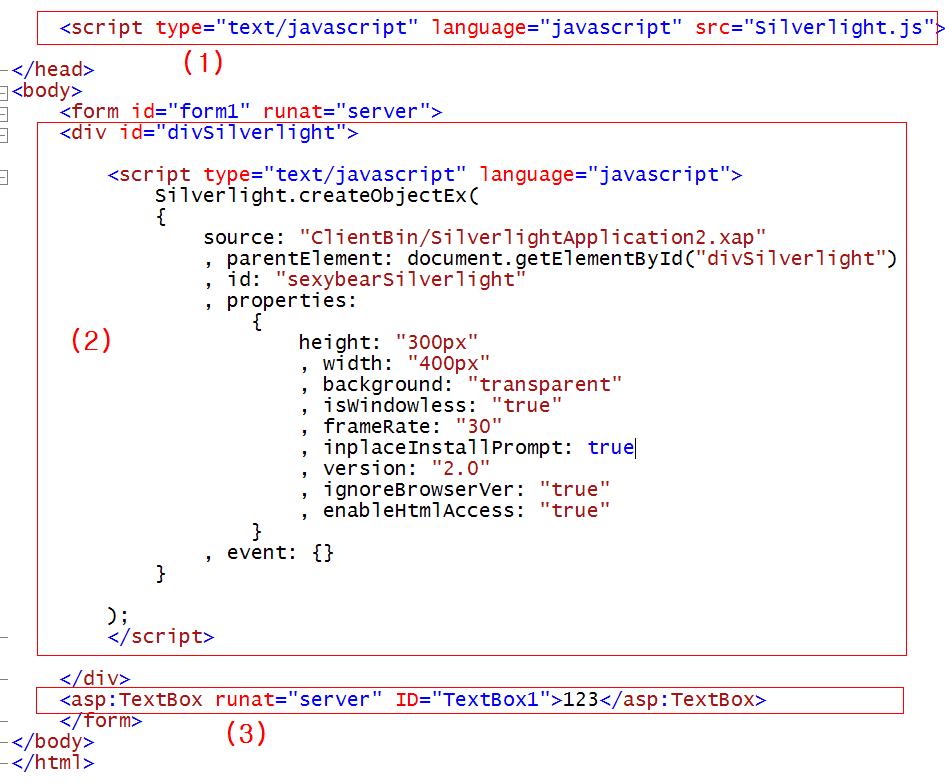
[silverlight] drag & grop

SilverLight 2009. 6. 2. 13:44 posted by 무명시인
*.xaml 은 다음처럼 구성한다..


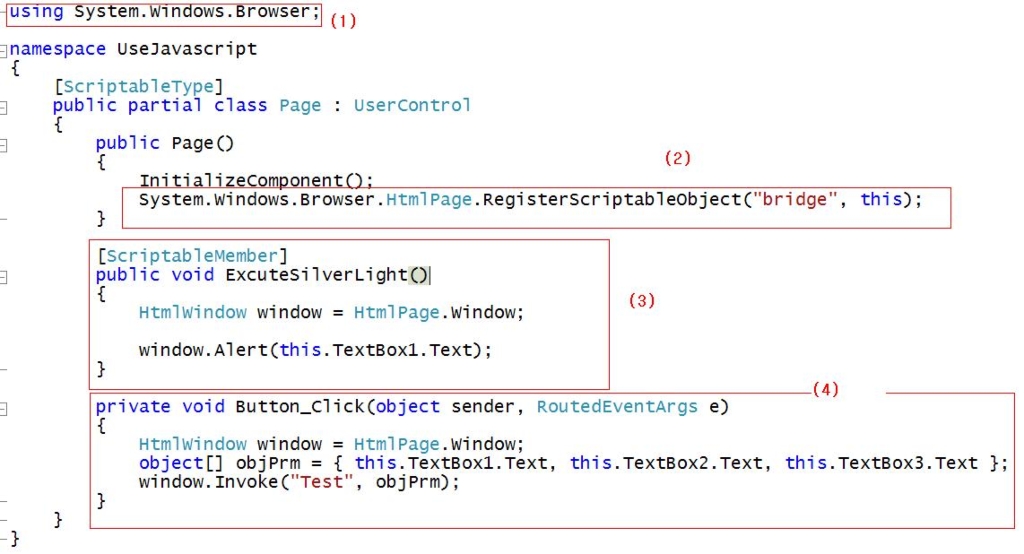
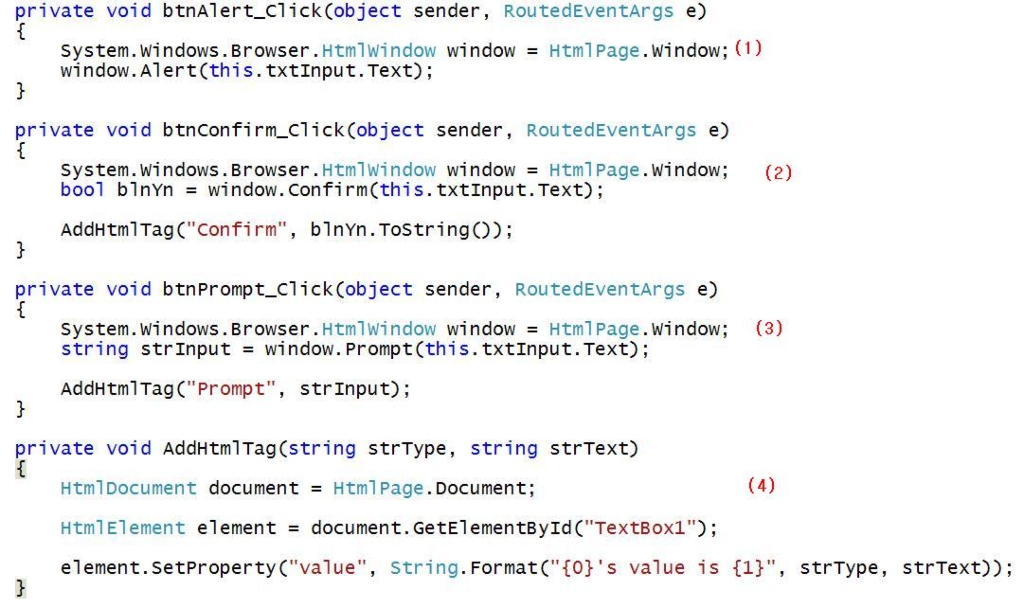
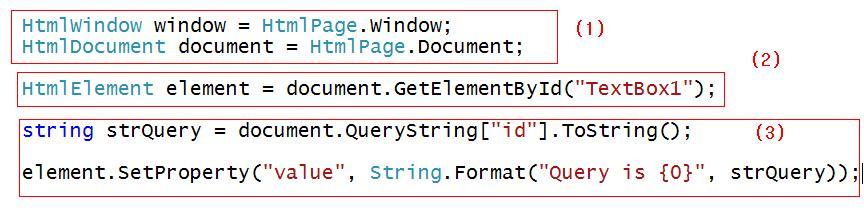
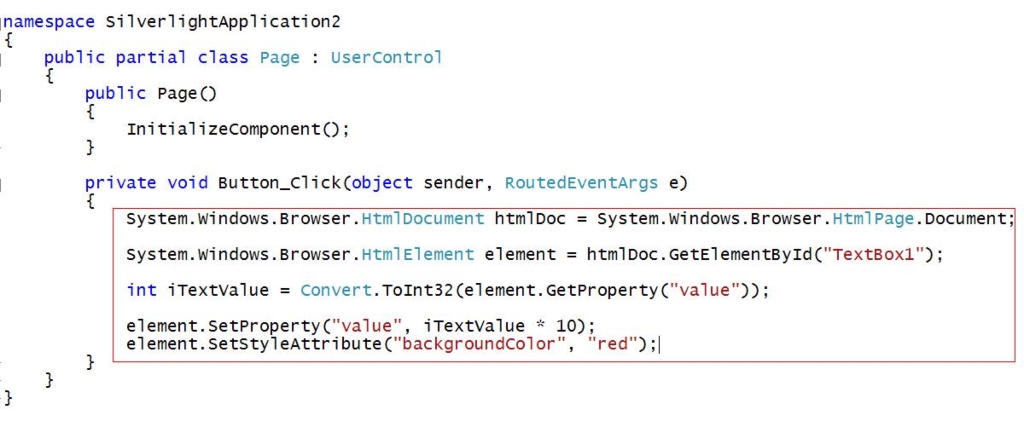
*.xaml.cs 는 다음처럼구성한다.


 using System;
using System.Windows;
using System.Windows.Controls;
using System.Windows.Input;

namespace ActionHandler02
{
    public partial class Page : UserControl
    {
        private bool isMouseDown = false;
        private Point lastPoint = new Point();
        private Point offset = new Point();

        public Page()
        {
            InitializeComponent();

            this.myTextBlock.MouseLeftButtonUp += new MouseButtonEventHandler(MyTextBlock_MouseLeftButtonUp);
            this.myTextBlock.MouseLeftButtonDown += new MouseButtonEventHandler(MyTextBlock_MouseLeftButtonDown);
            this.myTextBlock.MouseMove += new MouseEventHandler(myTextBlock_MouseMove);
        }

        void myTextBlock_MouseMove(object sender, MouseEventArgs e)
        {
            if (this.isMouseDown)
            {
                //마지막 좌표
                this.lastPoint = e.GetPosition(null);

                //텍스트블럭의 위치지정
                this.myTextBlock.SetValue(Canvas.LeftProperty, (this.lastPoint.X - this.offset.X));
                this.myTextBlock.SetValue(Canvas.TopProperty, (this.lastPoint.Y - this.offset.Y));
            }
        }

        void MyTextBlock_MouseLeftButtonDown(object sender, MouseButtonEventArgs e)         
        {
            //mouse캡춰를 System.Windows.UIElement 로 설정            
            this.myTextBlock.CaptureMouse();

            this.isMouseDown = true;

            //실버라이트 플러그인에서 위치 파악
            this.lastPoint = e.GetPosition(null);

            this.offset.X = this.lastPoint.X - Convert.ToDouble(this.myTextBlock.GetValue(Canvas.LeftProperty));
            this.offset.Y = this.lastPoint.Y - Convert.ToDouble(this.myTextBlock.GetValue(Canvas.TopProperty));
        }       
        
        void MyTextBlock_MouseLeftButtonUp(object sender, MouseButtonEventArgs e)
        {
            //mouse캡춰를 System.Windows.UIElement 해제
            this.myTextBlock.ReleaseMouseCapture();
            this.isMouseDown = false;
        }
    }
}

[silverlight] Grid 사용하기

SilverLight 2009. 4. 22. 15:35 posted by 무명시인
사용자 삽입 이미지

Silverlight 에서 사용하는 대표적인 컨테이너 컴포넌트 이다.

사용법은 위처럼..

<Grid.ColumnDefinitions><ColumnDefinition></ColumnDefinition></Grid.ColumnDefinitions>  

컬럼을 지정하는 Element 와..

<Grid.RowDefinitions><RowDefinition></RowDefinition></Grid.RowDefinitions>

로우를 지정하는 Element 를 사용한다..

.cs 에서도 동적으로 제어가 가능하다.

사용자 삽입 이미지

(1) (2)(3) Row, Column 을 추가한다.

(4)(5)  Row, Column 을 제거한다,

[Silverlight] 실버라이트와 Javascript 연동

SilverLight 2009. 4. 20. 14:26 posted by 무명시인
사용자 삽입 이미지


사용자 삽입 이미지
사용자 삽입 이미지


사용자 삽입 이미지
사용자 삽입 이미지


[Silverlight] BrowserInformation

SilverLight 2009. 4. 15. 14:27 posted by 무명시인
사용자 삽입 이미지

(1) BrowserVersion -> 브라우져 버젼

(2) CookiesEnabled -> 쿠키 사용여부

(3) Name                -> 브라우져 이름

(4) Platform             -> 운영체제

(5) UserAgent          -> 브라우져에서 서버로 보내지는 브라우져의 헤더값

[Silverlight] 경로이동

SilverLight 2009. 4. 15. 14:15 posted by 무명시인
사용자 삽입 이미지

(1) 현재창에서 이동

(2) 새창에서 이동.

Navigate() 메소드는 HTMLDOM의 window.open()함수와 같다.

[Silverlight] 경고창, 확인창, 입력창

SilverLight 2009. 4. 15. 14:05 posted by 무명시인
실버라이트에서 또한 간단한 코드로 경고창, 확인창, 입력창을 띄울 수 있다.

사용자 삽입 이미지


공통적으로 System.Windows.Browser.HtmlWindow 클래스에 속해있는 메소드를 사용한다.

일반 웹폼을 사용하는 것처럼..

메소드 명이 같다(Alert, Confirm, Prompt)..

(1) 실버라이트에 텍스트 박스를 한개 두고 입력값을 경고창으로 보여준다.

(2) 확인창의 예/아니오 값이 HTML 페이지의 텍스트 박스에 보여준다.

(3) 입력창에 입력한 값을 보여준다.

(4) HTML 텍스트박스에 값을 넣어준다.

[Silverlight] QueryString 을 가져와보자..

SilverLight 2009. 4. 15. 13:42 posted by 무명시인

사용자 삽입 이미지

(1) Window  개체와 Document 개체를 선언한다.

(2) 지난번 아티클에서 확인한 Html 페이지의 텍스트 박스 개체

(3) id 라는 키의 QueryString 을 가져와서 텍스트 박스에 뿌려준다.

사용자 삽입 이미지


이런식으로 QueryString 을 가져온다..

[Silverlight] Silverlight 와 HtmlDOM

SilverLight 2009. 4. 14. 15:10 posted by 무명시인

실버라이트와 HTML 은 밀접한 관련이 있다..

그렇지.. 결국은 웹페이지 위에 올려서 돌아 가는 것이니..

그리 하여..

실버라이트와 HTML DOM 에 대하여 간략하게 알아보자 ..

사용자 삽입 이미지


(1) 은 Silverlight.createObjectEx 메소드가 담긴 .js 이다..

(2) 는 지난번 아티클에서 설명한 Silverlight.createObjectEx 메소드

(3) 은 확인하기 좋은 텍스트 박스..

사용자 삽입 이미지

System.Windows.Browser.HtmlDocument 클래스는 HTML 관련 처리의 모든것을 담당하는 클래스 이다..

GetElementById 라는 메소드는 어디서 많이 보지 않았는가??

System.Windows.Browser.HtmlElement 클래스는 HTML 객체를 찾아다 담을수있다..

SetPropertySetStyleAttribute 메소드는 상태와 스타일을 설정해주는 함수이다..

매우 직관적이지 않는가??

책에 있는 예제를 타이핑후 옮겨본다..


[SilverLight]DataBinding 01

SilverLight 2008. 9. 16. 15:20 posted by 무명시인


이번에 훈스닷넷 세미나..
자료를 보던중..
궁금증이 생겨..
확인..
데이타를 바인딩 할때..
아래 세가지는 같은 방법이다..
킁킁,,

방법 하나.

------------------------------------------------------------------------------------------------
Page.Xaml -->

 <Canvas x:Name="cvLists" Background="Aqua" Width="400" Height="300">
            <TextBlock x:Name="tblTitle" Canvas.Top="5"  ></TextBlock>
            <TextBlock x:Name="tblContentS" Canvas.Top="20" Text="{Binding Content}" ></TextBlock>
            <TextBlock x:Name="tblRegDate" Canvas.Top="35" Text="{Binding RegDate, Converter={StaticResource DateConverter}}"></TextBlock>
            <TextBlock x:Name="tblHit" Canvas.Top="50" Text="{Binding Path=HitCount}"></TextBlock>
            <Image x:Name="imgThumbnail" Canvas.Left="65"
                   Width="20" Height="20"
                   Source="{Binding Thumbnail}"></Image>
            <Button x:Name="btnHit" Width="100" Height="20" Content="HIT" Canvas.Top="205"></Button>
        </Canvas>

Page.Xaml.cs
.....
     cvLists.DataContext = board;
......
그러니까 컨태이너 컨트롤의 DataContext 에 데이타를 바인딩 하는 방법

방법 두울.
------------------------------------------------------------------------------------------------

Page.Xaml --> 똑같이 바인딩 식을 빼고..

Page.Xaml.cs
            Binding binding = new Binding();    // System.Windows.Data.Binding;
            binding.Source = board;                // 데이타 원형
            binding.Path = new PropertyPath("Title");  // 속성
            tblTitle.SetBinding(TextBlock.TextProperty, binding); // 바인딩 타겟 컨트롤


System.Windows.Data.Binding  클래스 사용..

방법 두울.
------------------------------------------------------------------------------------------------
Page.Xaml --> 똑같이 바인딩 식을 빼고..

Page.Xaml.cs


 Board board = new Board();
...
tblTitle.Text = board.Title;
...

그러니까 예전 처럼..


[SilverLight] 파일을 올려 보자

SilverLight 2008. 7. 30. 08:59 posted by 무명시인

사용자 삽입 이미지

1. 실버 라이트 프로젝트를 만들어 봅니다.

사용자 삽입 이미지


2. 다음과 같이 솔루션이 구성이 됩니다.

사용자 삽입 이미지

3. 웹프로젝트에서 넘어온 파일 스트림을 저장할 제네릭 핸들러를 만들어 봅니다..
 
  이름은 'Receiver.ashx' 로 하겠습니다.

<%@ WebHandler Language="C#" Class="Receiver" %>

using System;
using System.Web;
using System.IO;

public class Receiver : IHttpHandler 
{
    private string strFileDir = "~/AttachFile/";
    //private string strFileDir = "
\\\\192.168.0.100\\ktdata\\";
     
    public void ProcessRequest (HttpContext context)
    {             
        string strFileName = context.Request["filename"].ToString();
        //strFileName = GetFilePath(strFileDir, strFileName);

        //string strFilePath = strFileDir + strFileName;       
        string strFilePath = context.Server.MapPath(strFileDir + strFileName);

        FileStream objFs = File.Create(strFilePath);
        SaveFiles(context.Request.InputStream, objFs);
    }

    private void SaveFiles(Stream objInputStream, FileStream objFs)
    {
        byte[] buffer = new byte[4096];
        int intbytesRead;

        while ((intbytesRead = objInputStream.Read(buffer, 0, buffer.Length)) != 0)
        {
            objFs.Write(buffer, 0, intbytesRead);           
        }
    }
 
    public bool IsReusable
    {
        get
        {
            return false;
        }
    }

    public string GetFilePath(string strBaseDirTemp, string strFileNameTemp)
    {
        string strFileName = System.IO.Path.GetFileNameWithoutExtension(strFileNameTemp);
        string strExt = System.IO.Path.GetExtension(strFileNameTemp);
        bool blnExists = true;
        int i = 0;

        while (blnExists)
        {
            if (System.IO.File.Exists(System.IO.Path.Combine(strBaseDirTemp, strFileNameTemp)))
            {
                i++;
                strFileNameTemp = strFileName + "(" + i + ")" + strExt;
            }
            else
            {
                blnExists = false;
            }
        }
        //return System.IO.Path.Combine(strBaseDirTemp, strFileNameTemp);
        return strFileNameTemp;
    }
}

사용자 삽입 이미지

4. 파일을 저장 할 폴더를 만들어 봅니다.

사용자 삽입 이미지

5. 자..이제 실버 라이토 프로젝트로 넘어와서..

다음 참조를 붙여 줍니다..


사용자 삽입 이미지


6. Page.xaml 를 구성합니다..아주 심플하게..

<UserControl x:Class="FileUpload.Page"
    xmlns="
http://schemas.microsoft.com/winfx/2006/xaml/presentation"
    xmlns:x="
http://schemas.microsoft.com/winfx/2006/xaml"
    Width="400" Height="300">
    <Grid x:Name="LayoutRoot" Background="White">
        <StackPanel >
            <Button Content="선택" FontFamily="Verdana" Width="100"  HorizontalAlignment="Left"  x:Name="btnUpload"  />
            <TextBlock x:Name="StatusText"  />
        </StackPanel>
    </Grid>
</UserControl>

7. Page.xaml.cs 도 마저 구성 하볼랍니다. 자세한 코드 설명은 하지 않습니다..

using System;
using System.Collections.Generic;
using System.Linq;
using System.Net;
using System.Windows;
using System.Windows.Controls;
using System.Windows.Documents;
using System.Windows.Input;
using System.Windows.Media;
using System.Windows.Media.Animation;
using System.Windows.Shapes;

using System.IO;
using System.Windows.Browser;
using System.Configuration;

namespace FileUpload
{
    public partial class Page : UserControl
    {
        Stream fileData;       

        public Page()
        {
            InitializeComponent();

            Loaded += new RoutedEventHandler(Page_Loaded);
            btnUpload.Click += new RoutedEventHandler(btnUpload_Click);
        }      

        void Page_Loaded(object sender, RoutedEventArgs e)
        {
            HtmlPage.RegisterScriptableObject("SilverLightFileUpload", this);
        }

        [ScriptableMember]
        public void btnUpload_Click(object sender, RoutedEventArgs e)
        {
            OpenFileDialog openFile = new OpenFileDialog();
            openFile.Multiselect = false;
            openFile.Filter = "All files|*.*";

            if (Convert.ToBoolean(openFile.ShowDialog()))
            {
                this.StatusText.Text = openFile.SelectedFile.Name;

                UploadFile(openFile.SelectedFile.Name, openFile.SelectedFile.OpenRead());               
            }
            else
            {
                this.StatusText.Text = "화일을 선택해";
            }                                                    
        }       

        private void UploadFile(string strFileName, Stream objStream)
        {
            UriBuilder ub = new UriBuilder("
http://localhost:1897/FileUploadWeb/Receiver.ashx");
            ub.Query = String.Format("filename={0}", strFileName);

            WebClient wc = new WebClient();

            wc.OpenWriteCompleted += (sender, e) =>
                {
                    Pushdata(objStream, e.Result);
                    e.Result.Close();
                    objStream.Close();
                };
            wc.OpenWriteAsync(ub.Uri);      
        }

        private void Pushdata(Stream objInputStream, Stream objOutputStream)
        {
            byte[] buffer = new byte[4096];
            int bytesRead;

            while ((bytesRead = objInputStream.Read(buffer, 0, buffer.Length)) != 0)
            {
                objOutputStream.Write(buffer, 0, bytesRead);
            }
        }        
    }
}

8. 다 했으면  F5 를 꾹 눌러 봅니다..

  파일 창이 열리고 파일을 선택하면 하단에 파일이름이 보입니다.

사용자 삽입 이미지

9. 파일 첨부 폴더를 확인합니다..  오호라..  들어가 있군요..
사용자 삽입 이미지

10.  출처는 MSDN 입니다.